
What You Will Build
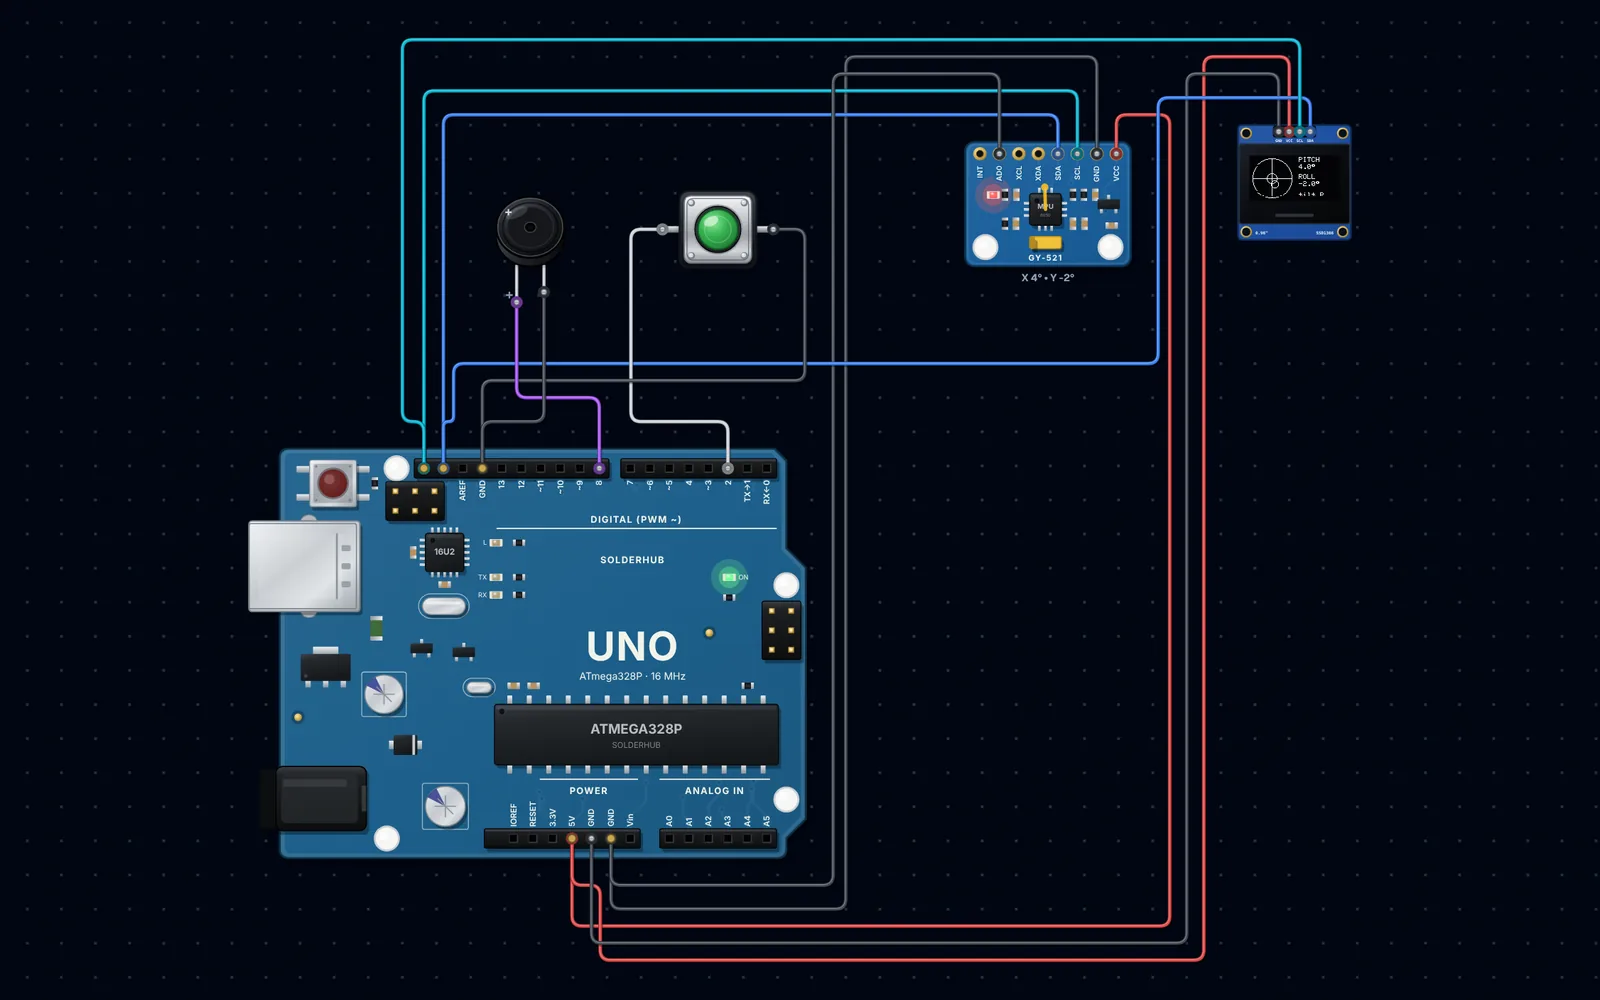
Quick answer: wire the MPU-6050 and the SSD1306 OLED to the same I2C pins (A4, A5), add a push button on D2 and a buzzer on D8, and load the sketch. The OLED shows a round vial with a bubble, pitch and roll in degrees, and a LEVEL badge with a beep when both are within ±0.5°.
This project skips the IMU library and talks to the MPU-6050 register by register, which is the best way to understand what a library really does. Along the way you will:
- Wake the MPU-6050 and set its range and filter with three register writes
- Read six bytes of acceleration and turn them into g
- Convert gravity into pitch and roll with
atan2() - Smooth the angles with a simple low-pass filter
- Zero the level on a surface you trust, like a real digital level
Components
7 itemsNeed these parts? Get this build sheet by email
Parts list with buy links, plus new builds as they're published. By subscribing you agree to our Privacy Policy. Unsubscribe anytime.
⚠️ Warning
Mount the MPU-6050 flat and rigidly against the base of your level. Any tilt between the board and the surface it sits on becomes a permanent error. The zero button corrects that offset, but only if the board cannot move afterwards.
How It Works
Gravity Tells You the Angle
The MPU-6050 contains a 3-axis accelerometer and a 3-axis gyroscope. When it is still, the only acceleration it feels is gravity, 1 g pointing down. Lying flat, the whole 1 g appears on the Z axis. Tilt it and some of that 1 g moves onto X or Y. Comparing the three tells you the angle:
pitch = atan2(ax, sqrt(ay² + az²))
roll  = atan2(ay, sqrt(ax² + az²))
Using atan2 with the other two axes keeps the result accurate all the way to ±90°, where a simple asin would become unstable.
The Registers Used
| Register | Address | Value | Meaning |
|---|---|---|---|
| PWR_MGMT_1 | 0x6B | 0x00 | Wake up (the chip starts asleep) |
| ACCEL_CONFIG | 0x1C | 0x00 | ±2 g range, 16384 counts per g |
| CONFIG | 0x1A | 0x04 | Digital low-pass filter around 20 Hz |
| ACCEL_XOUT_H | 0x3B | read 6 bytes | X, Y, Z, high byte first |
Why the Level Must Be Still
An accelerometer cannot tell gravity from movement. Shake it and the angles jump. That is fine for a level, which is used still, and the low-pass filter (SMOOTHING = 0.25) settles the reading in a fraction of a second. For a moving device such as a drone you would blend in the gyroscope with a complementary or Kalman filter.
Sharing the I2C Bus
Both modules sit on the same two wires because they have different addresses:
| Device | I2C address |
|---|---|
| MPU-6050 (AD0 to GND) | 0x68 |
| SSD1306 OLED | 0x3C |
Try It in the Simulator First
Run the circuit below and click the MPU-6050 to change its tilt. The bubble moves away from the low side, the angles update and the LEVEL badge appears with a beep when you bring both axes within half a degree. Press the button to zero the current position. The I2C analyzer shows every register read.
Try it in the simulator
Wiring
| Part | Part pin | Arduino Uno |
|---|---|---|
| MPU-6050 | VCC / GND | 5V / GND |
| MPU-6050 | SDA / SCL | A4 / A5 |
| MPU-6050 | AD0 | GND (address 0x68) |
| OLED | VCC / GND | 5V / GND |
| OLED | SDA / SCL | A4 / A5 |
| Zero button | One side / other side | D2 / GND |
| Buzzer | + / − | D8 / GND |
The GY-521 board has its own 3.3 V regulator and pull-up resistors, so it is safe on the Uno's 5 V. Check your OLED: most 0.96-inch modules accept 3.3 to 5 V, but a few are 3.3 V only. Some OLEDs have VCC and GND swapped compared with the order above, so read the silkscreen before powering up.
The Code
Install Adafruit SSD1306 and Adafruit GFX from the Library Manager. No MPU-6050 library is needed. The OLED's 1 KB frame buffer uses half the Uno's RAM, which is why the sketch keeps everything else small.
Key Parts of the Code Explained
| Code | What it does |
|---|---|
mpuWrite(0x6B, 0x00) | Clears the sleep bit so the MPU-6050 starts measuring |
Wire.endTransmission(false) | Keeps the bus (repeated start) between choosing the register and reading it |
(Wire.read() << 8) | Wire.read() | Joins high and low bytes into a signed 16-bit value |
x / 16384.0 | Converts counts into g at the ±2 g range |
pitch += SMOOTHING * (rawPitch - pitch) | Exponential low-pass filter that removes jitter |
pitchZero = pitch | Stores the current angle as zero when the button is pressed |
level && !wasLevel | Beeps only on the moment the level is reached, not continuously |
Upload and Test
- Upload with the board lying flat and open the Serial Plotter at 9600 baud to see pitch and roll.
- Place the level on a surface you know is flat and press the zero button.
- Run these checks.
| Check | Expected |
|---|---|
| Flat after zeroing | 0.0° / 0.0°, bubble centred and filled, LEVEL, one beep |
| Raise one end by 1 cm over 30 cm | About 1.9° of pitch |
| Tilt sideways | Roll changes, pitch stays near 0 |
| Shake the level | Angles jump, then settle within about half a second |
To check accuracy, measure the same surface, turn the level through 180° and measure again. The two readings should be equal and opposite; any difference is twice the remaining offset.
Troubleshooting
| Problem | Likely cause | Fix |
|---|---|---|
MPU-6050 not responding | Wrong wiring or address | Check SDA/SCL; with AD0 HIGH the address is 0x69 |
| All angles stay 0 | Chip still asleep | Make sure the 0x6B write happens before reading |
OLED not found | Wrong address | Try 0x3D; run an I2C scanner |
| OLED shows noise or freezes | Low RAM | Do not add large arrays; use F() for strings |
| Reading drifts after zeroing | Board moving on its mount | Fix the module rigidly with screws or foam tape |
| Bubble moves the wrong way | Module mounted rotated | Swap the sign of bx or by in drawScreen() |
| Pitch and roll swapped | Module turned 90° | Swap ax and ay in the angle formulas |
Make It Your Own
- Save the zero in EEPROM so it survives power-off.
- Inclinometer mode: show a single large angle for setting saw blades or ramps.
- Gyro fusion: add a complementary filter using the gyroscope for a stable reading while moving.
- Battery build: a 3.7 V LiPo with a 5 V boost module and an on/off switch.
- Wireless: send the angle to a phone over Bluetooth with an ESP32.
FAQ
Do I need a library for the MPU-6050?
No. Three register writes set it up and one six-byte read returns the acceleration. Libraries are convenient but do the same thing underneath.
How accurate is an MPU-6050 spirit level?
With a rigid mount and zeroing, readings within about 0.1 to 0.2° are realistic when still. Temperature changes and vibration make it worse.
Why do the angles jump when I move it?
The accelerometer measures movement as well as gravity. The level is meant to be used still; a gyroscope fusion filter is needed for moving objects.
Can the MPU-6050 and OLED share I2C pins?
Yes. I2C is a bus. The MPU-6050 uses address 0x68 and the OLED 0x3C, so both answer on A4 and A5.
Can I measure yaw (heading)?
Not from gravity: turning around the vertical axis does not change it. You need a magnetometer, as in the MPU-9250, for heading.
What You Learned
You talked to a sensor at register level, turned raw acceleration into angles, filtered the result and drew a live graphic on an OLED. Compare the MPU-6050 with its successors in MPU6050 vs MPU6500 vs MPU9250 vs ICM-20948, see how I2C works in I2C vs SPI, and use the same sensor for motion in the gesture controlled robotic arm.


