
What You Will Build
Quick answer: connect an HC-SR501's OUT to D2, an LDR module's AO to A0 and a relay module's IN to D7, with the lamp on the relay's COM and NO contacts. After a 30 s PIR warm-up, the sketch turns the lamp on when the light reading is below 350 and motion is seen, and turns it off 20 s after the last movement.
This is the logic inside every porch and stair light, done properly:
- Only in the dark, with hysteresis so dusk does not make it flicker between day and night
- Hold timer that restarts with every movement
- No self-switching: while the lamp is on, the light sensor is ignored, so the lamp's own light cannot turn it off
- Warm-up handling for the PIR, with a fast-blinking status LED
Components
6 itemsNeed these parts? Get this build sheet by email
Parts list with buy links, plus new builds as they're published. By subscribing you agree to our Privacy Policy. Unsubscribe anytime.
⚠️ Warning
Start with a 12 V LED lamp. Switching a mains lamp means 230 V or 120 V on the relay's screw terminals, which can kill. If you do switch mains, use an enclosed, rated relay module or a ready-made smart relay, keep the mains wiring inside an insulated box, and have it checked by a qualified electrician.
How It Works
The HC-SR501 PIR Sensor
A PIR (passive infrared) sensor does not send anything out. Its pyroelectric element, split into two halves behind the white Fresnel lens, notices when warm infrared from a moving body reaches one half before the other. The module's own chip then drives OUT HIGH (3.3 V), which the Uno reads as a digital HIGH.
| Setting | Where | What to set |
|---|---|---|
| Sensitivity | Left trimmer | Range from about 3 m to 7 m |
| Time delay | Right trimmer | Fully anticlockwise (about 3 s), because the Arduino does the timing |
| Trigger mode | Jumper | H (repeat): OUT stays HIGH while motion continues |
| Warm-up | None | About 30 to 60 s after power-up, during which OUT is unreliable |
The LDR Module
A light-dependent resistor's resistance falls as light increases. The module puts it in a voltage divider and outputs a voltage on AO. On this module a higher reading means brighter. Some modules are wired the other way round; the troubleshooting table shows how to tell and what to change.
Day, Night and Hysteresis
| Condition | Result |
|---|---|
| Reading drops below 350 | It becomes dark |
| Reading rises above 450 | It becomes day again |
| Between 350 and 450 | Stays in whatever state it was |
That 100-count gap stops the light deciding "dark, light, dark, light" every second at dusk. The decision is also frozen while the lamp is on, because the lamp itself would otherwise brighten the sensor and switch itself off.
Try It in the Simulator First
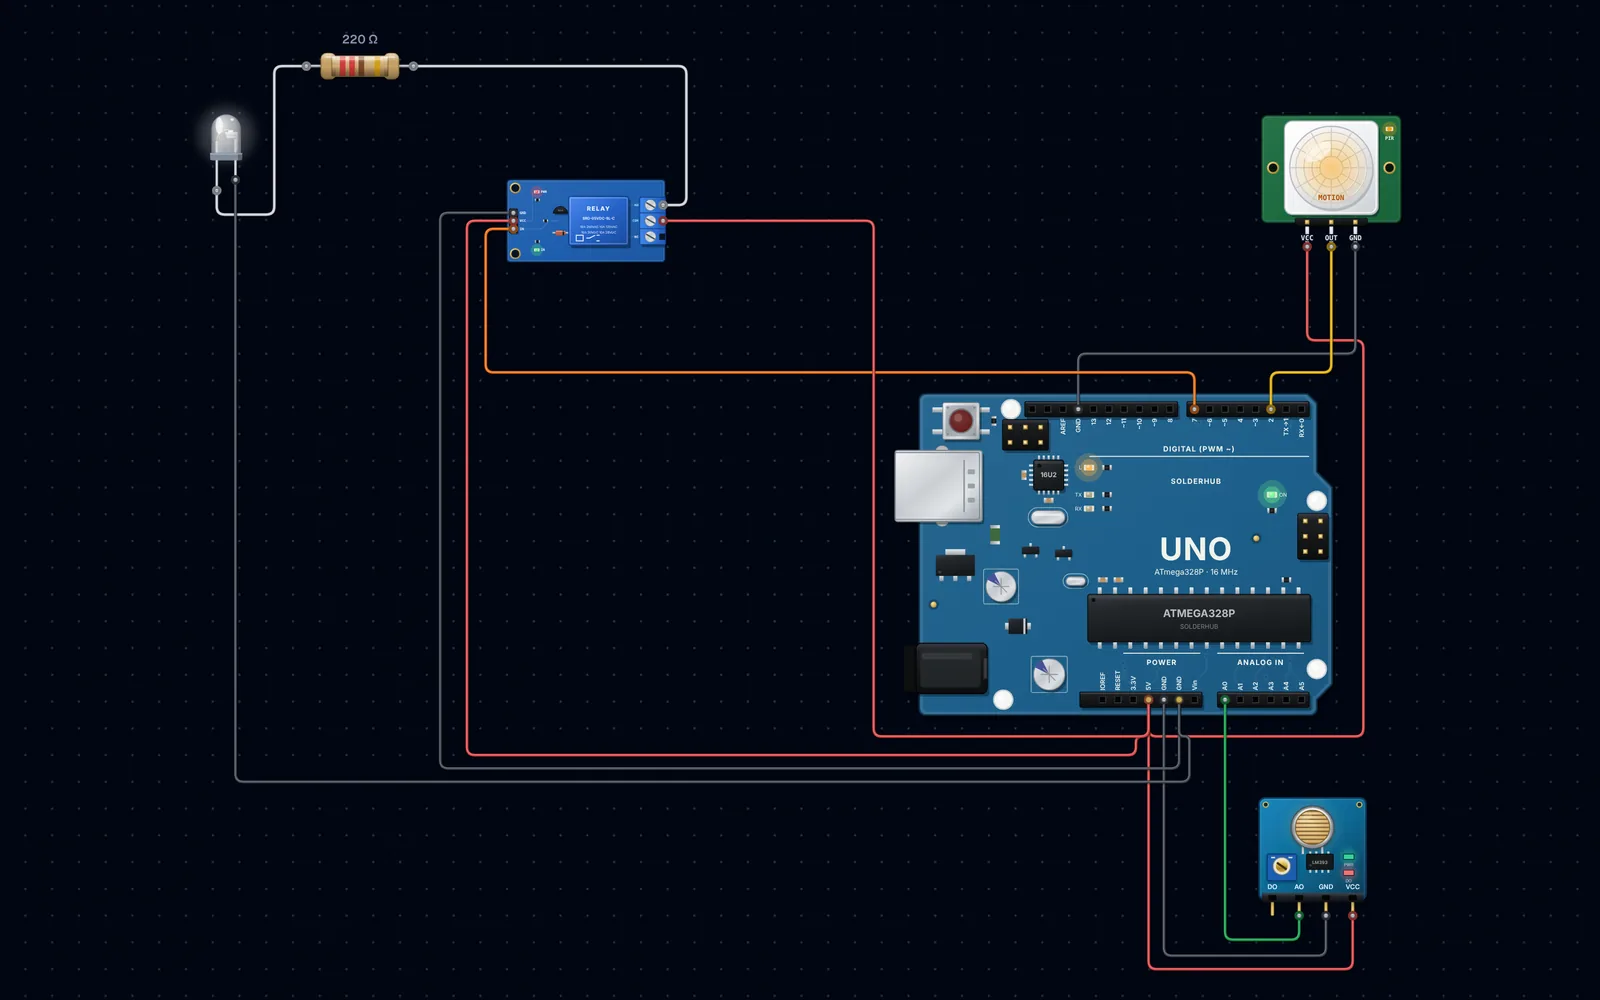
The circuit below runs this sketch. Wait for the 30 s warm-up (the on-board LED blinks fast), then open the PIR's settings and switch motion on: the relay clicks and the lamp lights. Turn motion off and the Serial Monitor counts down 20 s before the lamp goes out. Raise the LDR's light level and motion no longer turns the lamp on.
Try it in the simulator
Wiring
| Part | Part pin | Arduino Uno |
|---|---|---|
| HC-SR501 | VCC / GND | 5V / GND |
| HC-SR501 | OUT | D2 |
| LDR module | VCC / GND | 5V / GND |
| LDR module | AO | A0 |
| Relay module | IN / VCC / GND | D7 / 5V / GND |
| Relay contacts | COM | Lamp supply + |
| Relay contacts | NO | Lamp + |
| Lamp | − | Lamp supply − |
The PIR's pin order varies between batches; read the labels under the lens cap. Use the relay's NO (normally open) contact so the lamp is off when the Arduino is unpowered. In the simulator a white LED with a 220 Ω resistor stands in for the lamp.
The Code
No libraries are needed. Tune DARK_BELOW and LIGHT_ABOVE to your room after watching the readings in the Serial Monitor.
Key Parts of the Code Explained
| Code | What it does |
|---|---|
while (millis() < WARMUP_MS) | Waits 30 s for the PIR to settle, blinking the on-board LED |
readLight() | Averages four ADC readings for a steadier light level |
if (!lampOn) { ... isDark ... } | Updates day/night only while the lamp is off, with hysteresis |
if (motion) lastMotion = now | Every movement restarts the hold timer |
if (isDark && motion) setLamp(true) | Both conditions are needed to switch on |
now - lastMotion >= HOLD_MS | Switches off 20 s after the last movement |
setLamp() | Changes the relay only when the state changes, and logs it |
Upload and Test
- Upload, open the Serial Monitor at 9600 baud and wait for
Ready. - Watch the
light=value with the room lit and with your hand over the LDR, and set the thresholds between them.
| Test | Expected |
|---|---|
| Room lit, walk past | day motion=1, lamp stays off |
| Cover the LDR, walk past | Lamp ON, relay clicks |
| Keep moving | lamp off in 20 s keeps resetting |
| Stand still | Count down, then Lamp OFF |
| Lamp on and shining on the LDR | Lamp stays on until the timer ends |
Troubleshooting
| Problem | Likely cause | Fix |
|---|---|---|
| Lamp switches on at power-up | PIR warming up | Keep WARMUP_MS at 30 to 60 s |
| Never detects motion | Wrong pin order or trigger jumper | Check VCC/OUT/GND labels; set the jumper to H |
| Stays on far longer than 20 s | PIR time-delay trimmer turned up | Turn it fully anticlockwise |
| Works in daylight, never at night | Module output inverted (dark = high reading) | Use 1023 - analogRead() in readLight() |
| False triggers | Heat sources, sunlight, air vents in view | Re-aim the sensor, lower the sensitivity |
| Relay switches the wrong way | Active-LOW relay module | Swap HIGH and LOW for RELAY_PIN |
| Lamp turns itself off | LDR sees the lamp | Already handled; shade the LDR if hysteresis is too narrow |
Make It Your Own
- Dimmable LED strip: replace the relay with a MOSFET and fade the light in and out with PWM.
- Brightness knob: add a potentiometer to set the darkness threshold.
- Two zones: add a second PIR for stairs top and bottom.
- Alarm mode: a switch that turns the same circuit into an intruder alarm with a buzzer.
- Smart home: port it to an ESP32 and report motion to Home Assistant over MQTT.
FAQ
How long does the HC-SR501 take to warm up?
About 30 to 60 seconds after power-up. During that time its output can switch randomly, so the sketch ignores it until the warm-up ends.
Why does my PIR light stay on too long?
The module has its own time-delay trimmer that can hold OUT HIGH for minutes. Turn it fully anticlockwise and let the Arduino's HOLD_MS do the timing.
Can the PIR see through glass?
No. Glass blocks the long-wave infrared a PIR detects, so it will not detect people behind a window.
Why use hysteresis on the light sensor?
At dusk the light level hovers around the threshold. Two separate thresholds stop the light flipping between day and night every few seconds.
Can I switch a mains lamp with this relay?
Many modules are rated for it, but mains wiring is dangerous. Start with a 12 V lamp and only switch mains in a proper enclosure with qualified help.
What You Learned
You combined two sensors with AND logic, built a retriggerable timer, added hysteresis and avoided a feedback loop between the lamp and its own sensor. For a security-camera version of motion detection see the ESP32-CAM PIR motion detection camera, and for other Uno input pins see the Arduino Uno pinout guide.


