The Ultimate Guide: How to Use MQTT with ESP32 and Home Assistant
If you've blinked your LEDs, read data from a temperature sensor, and set up a simple web server on your microcontroller — you're ready for the next step. This guide takes you from basics to a fully networked, MQTT-based smart home system where dozens of sensors and relays communicate in real-time.
We'll connect the ESP32 to Home Assistant using MQTT, with a secure Mosquitto broker, production-ready code, and full Home Assistant integration.
Chapter 1: The Modern Smart Home Architecture
Before writing code, you need to understand how a modern, localized smart home is structured. A robust system doesn't rely on third-party cloud servers. It runs entirely on your local network.
The standard stack has three layers:
The Central Brain — The Server Typically a Raspberry Pi running a full Linux OS. It's always on, low-power, and hosts your smart home software.
The Ecosystem — The Software Home Assistant, Node-RED, and InfluxDB run here. These handle dashboards, automation logic (turn on a light when motion is detected), and historical data storage.
The Edge Nodes — The Hardware This is where your ESP32 and ESP8266 circuits live. They read sensors, toggle relays, and beam data back to the central brain over WiFi.
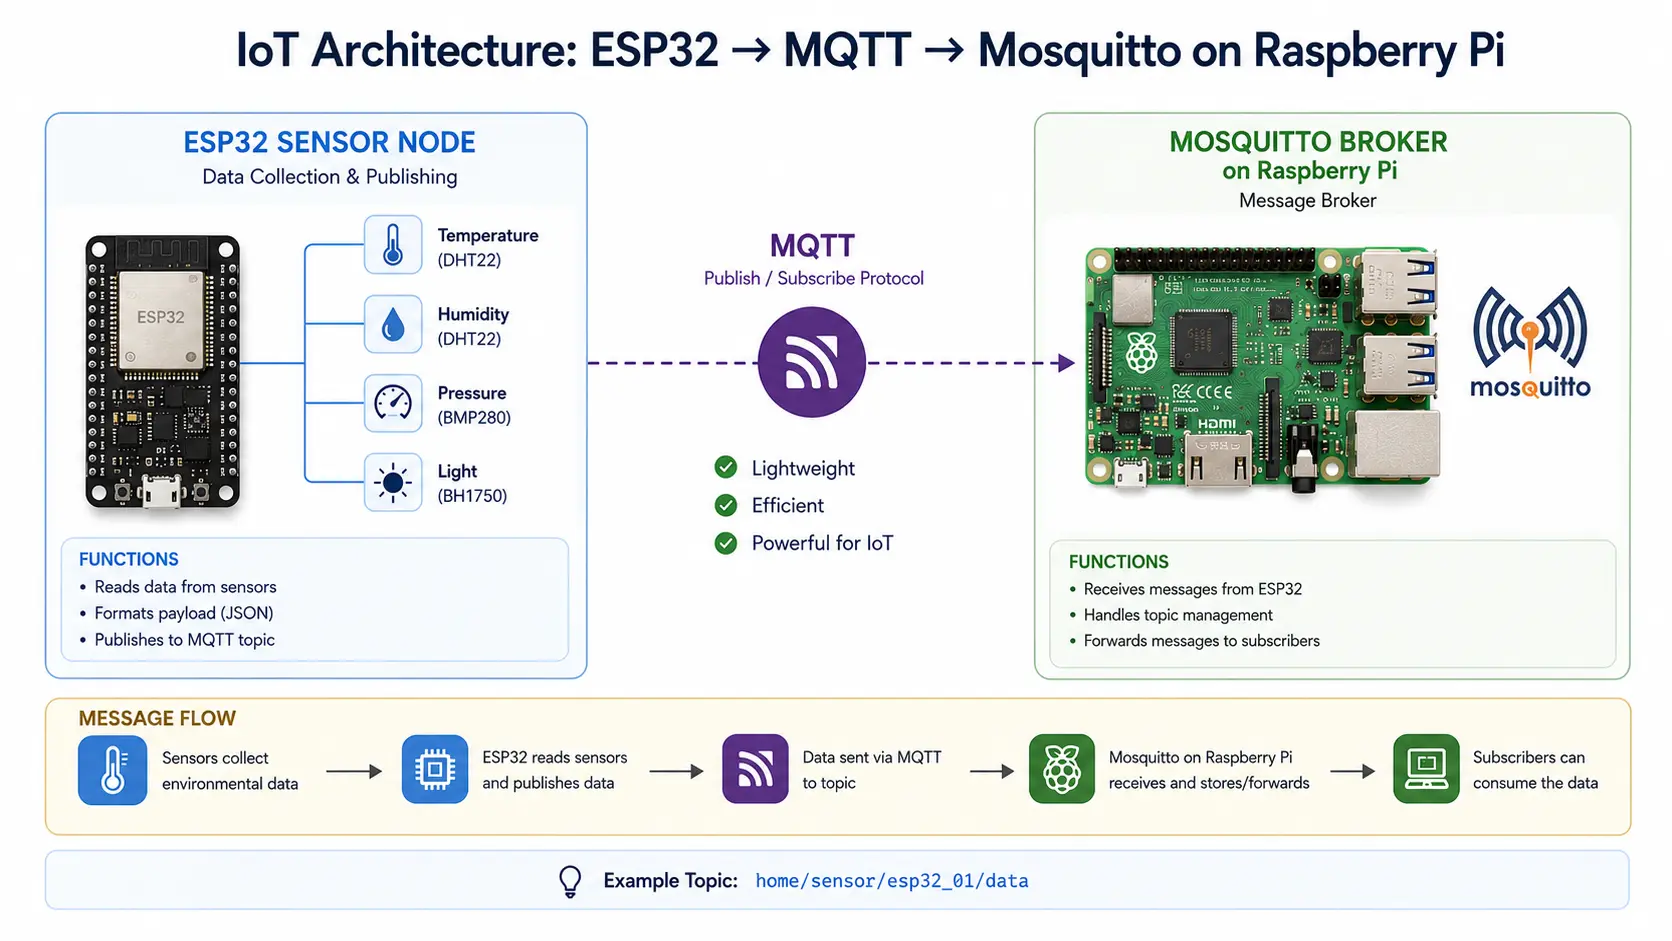
But how do these edge nodes talk to the brain? They need a protocol. HTTP works, but it's bulky and resource-hungry. This is where MQTT changes everything.
Chapter 2: Demystifying MQTT
MQTT stands for Message Queuing Telemetry Transport. It's a lightweight publish-subscribe protocol built for low-bandwidth, high-latency networks — the industry standard for IoT.
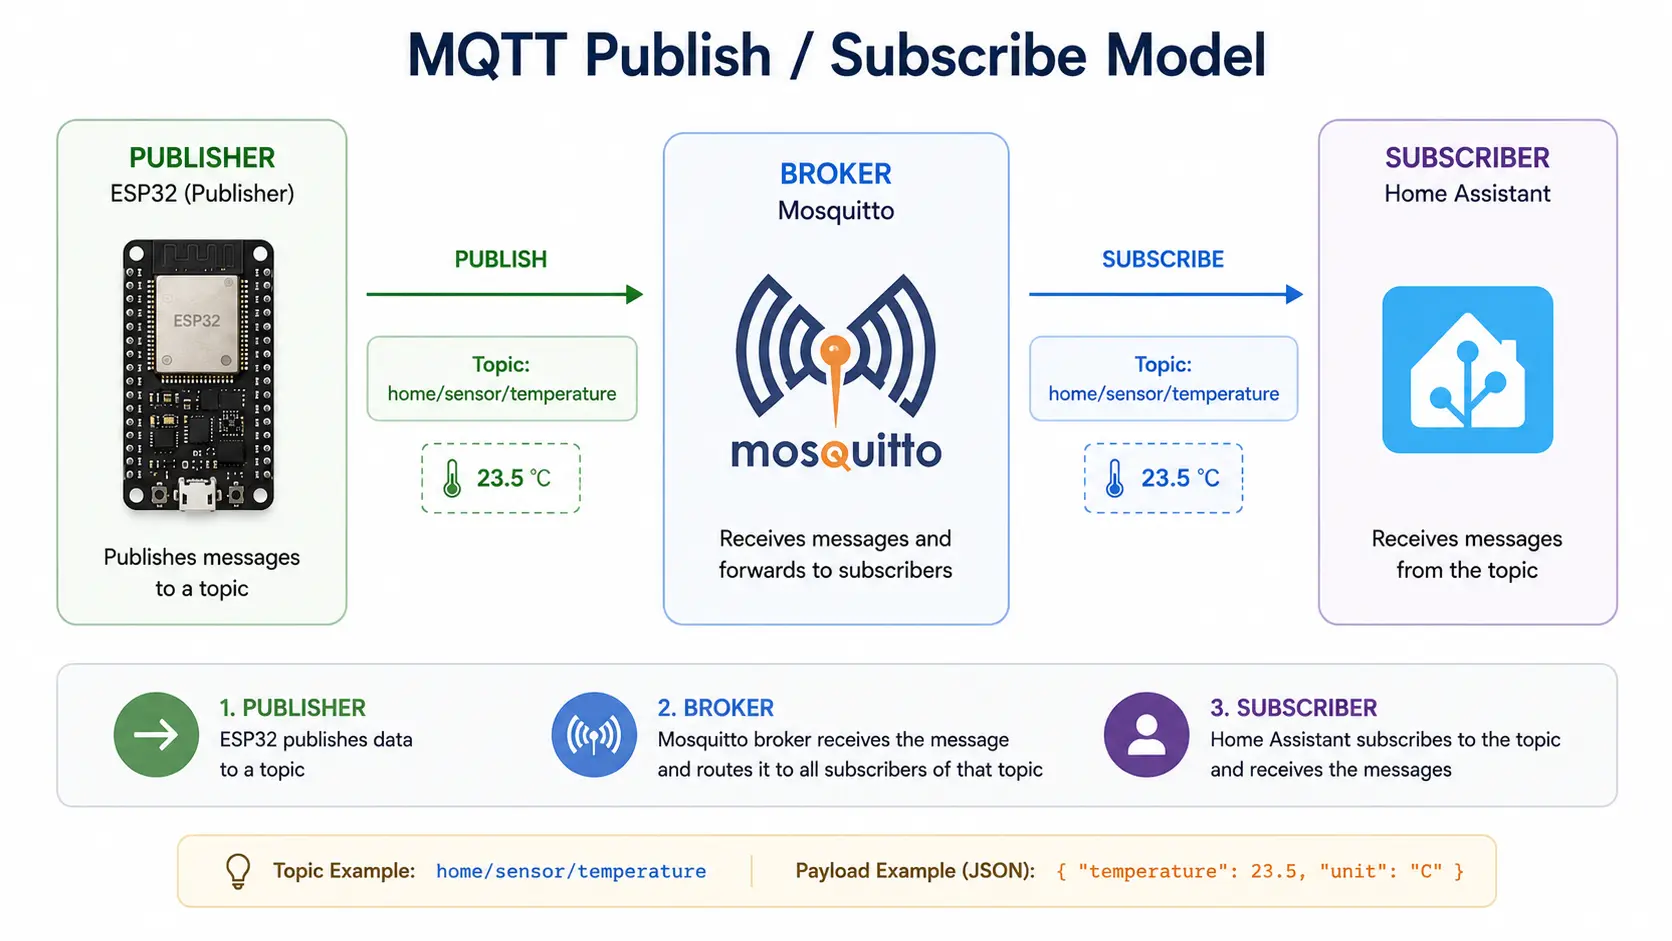
The Publish / Subscribe Model
Unlike HTTP (ask → receive), MQTT uses a Pub/Sub model. Think of it as a post office:
| Role | Description | Example |
|---|---|---|
| Broker | The post office. Routes all messages. | Mosquitto on Raspberry Pi |
| Publisher | Drops off a message to a topic. | ESP32 sending temperature |
| Subscriber | Checks their P.O. box for messages. | Home Assistant reading sensor data |
| Topic | The address on the envelope. | home/livingroom/temperature |
The ESP32 drops off its message and immediately returns to work — saving processing time and power. Combined with deep sleep techniques, an ESP32 can run on batteries for months rather than days.
Chapter 3: Setting Up the Broker — Raspberry Pi and Mosquitto
You need a broker before anything else. We'll install Mosquitto on a Raspberry Pi.
Installing Mosquitto
Open your Raspberry Pi terminal and run:
sudo apt update
sudo apt install mosquitto mosquitto-clients
Enable it to auto-start on reboot:
sudo systemctl enable mosquitto
Securing the Broker — Create a User
Never leave your broker open to any device on your network. Add authentication:
sudo mosquitto_passwd -c /etc/mosquitto/passwd mqtt_user
Enter a strong password when prompted. Then edit the Mosquitto config:
sudo nano /etc/mosquitto/mosquitto.conf
Add these two lines at the bottom:
allow_anonymous false
password_file /etc/mosquitto/passwd
Save, exit, and restart:
sudo systemctl restart mosquitto
Your broker is now secure and running on port 1883. ✅
Chapter 4: Programming the ESP32 Node
Time to write the firmware. This ESP32 will act as a dual-purpose node — it publishes temperature data and subscribes to a command topic so Home Assistant can toggle an onboard LED (representing a relay).
Install the Library
In Arduino IDE: Sketch → Include Library → Manage Libraries → search PubSubClient by Nick O'Leary → Install.
Understanding the Code
Publishing: The loop() uses a non-blocking millis() timer to publish simulated sensor data to home/livingroom/temperature every 10 seconds. Replace random() with real DHT22 or MQ135 readings when you're ready.
Subscribing: reconnect() subscribes to home/livingroom/light/set. The callback() function listens on that topic — when it receives "ON", it drives Pin 2 HIGH, turning the LED on.
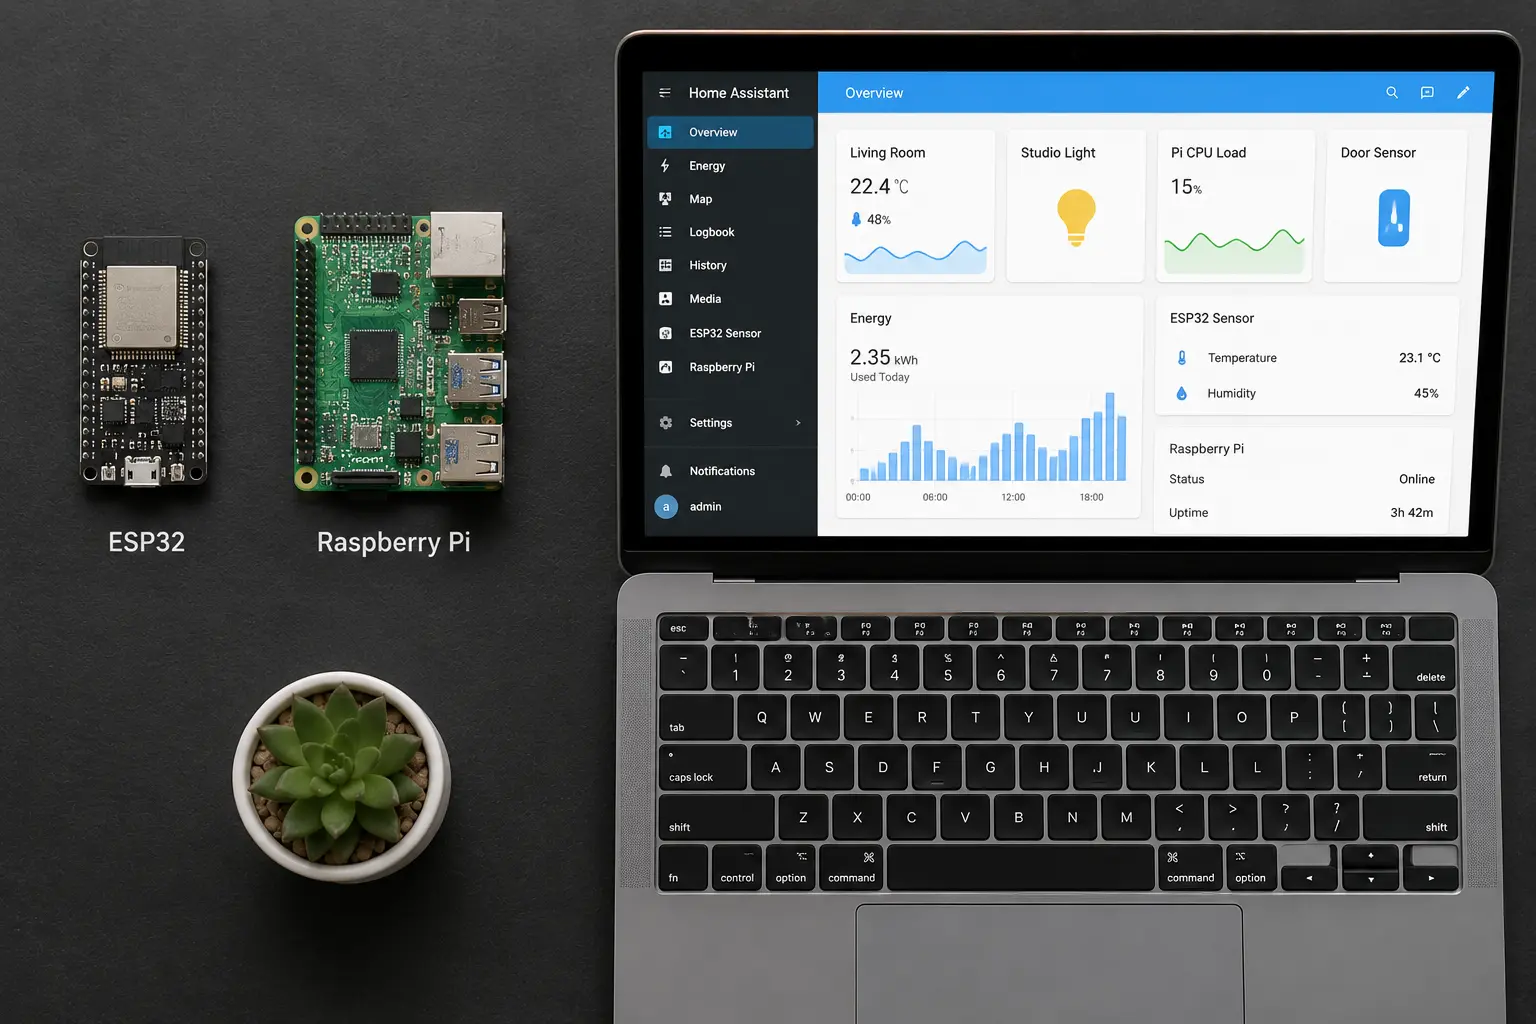
Chapter 5: Integrating with Home Assistant
Broker is running. ESP32 is publishing. Now give this data a proper UI inside Home Assistant.
Editing configuration.yaml
Add the following block to your configuration.yaml file:
Save the file and fully restart Home Assistant (not just reload).
What Happens Next
After HA reboots, navigate to your Lovelace dashboard and add an Entity card. You'll find two new entities:
sensor.living_room_temperature— updates every 10 seconds from the ESP32switch.living_room_lamp— toggling it publishesONorOFFto the broker, which routes it to the ESP32, which physically toggles the LED
You've just built a complete, end-to-end, localized IoT network.
Chapter 6: Expanding Your Ecosystem
MQTT scales effortlessly. To add a garage sensor, copy the same code, change the topic to home/garage/temperature, and power it on. The broker handles all routing automatically.
Where to go from here:
- Long-term storage: Route MQTT topics into an InfluxDB database for historical graphs
- Custom dashboards: Pipe MQTT data into Node-RED running alongside Home Assistant
- Vision projects: An ESP32-CAM can publish
parking/space1/status: occupiedvia MQTT after processing a camera frame locally - Battery-powered nodes: Use ESP32 deep sleep — wake, publish, sleep — and run on batteries for months
Common Issues & Fixes
| Error | Cause | Fix |
|---|---|---|
rc=-2 in Serial Monitor | Broker IP wrong or broker not running | Check your Pi's IP; confirm Mosquitto is started |
rc=-4 timeout | Firewall blocking port 1883 | Allow inbound port 1883 on your Pi's firewall |
| ESP32 keeps reconnecting | delay() blocking client.loop() | Use millis() for timing — never delay() in main loop |
| HA shows no data | YAML indentation error | Check with Developer Tools → YAML validator |
| Switch in HA doesn't reflect LED state | ESP32 not publishing state back | Add client.publish("home/livingroom/light/status", "ON") inside the callback |
Conclusion
Transitioning from simple Arduino scripts to a fully networked, MQTT-based smart home is the defining moment in any maker's journey. You now have:
✅ A secure Mosquitto broker on Raspberry Pi
✅ An ESP32 that both publishes sensor data and receives commands
✅ Real-time Home Assistant integration with a working dashboard
The same pattern scales to any number of nodes. Add temperature sensors, motion detectors, soil moisture sensors, door contacts — each one just needs a unique topic and the same core code structure.
Next reads:
- Raspberry Pi GPIO Complete Guide
- ESP32 Deep Sleep: Extend Battery Life from Days to Months
- ESP32 Plant Watering System with MQTT
Published on SolderHub — Build. Simulate. Learn.