


The DHT11 (blue) and the DHT22 (white, also sold as the AM2302) are the two temperature and humidity sensors almost every maker meets first. They share the same pinout, the same single data wire, the same library and the same code: change one line, DHTTYPE, and a sketch written for one runs on the other.
What differs is the quality of the numbers. The DHT11 is cheap and coarse: whole degrees, ±2 °C, and nothing below 0 °C. The DHT22 costs a little more and returns tenths of a degree, ±0.5 °C, and reaches down to −40 °C. This page explains both side by side: what is inside, every pin, how the single-wire protocol works (with a decoded frame for each sensor), which one to buy, and how to avoid the classic NaN readings. When you are ready to build, the Arduino Uno guide and the ESP32 guide take you from wiring to working projects for either sensor.
Specifications
| Parameter | DHT11 | DHT22 / AM2302 |
|---|---|---|
| Supply voltage | 3.3 to 5.5 V DC | 3.3 to 5.5 V DC (older datasheets quote up to 6 V) |
| Temperature range | 0 to 50 °C | −40 to 80 °C |
| Temperature accuracy | ±2 °C | ±0.5 °C |
| Temperature resolution | 1 °C (newer revisions also report tenths) | 0.1 °C |
| Humidity range | 20 to 90 %RH (newer ASAIR revisions quote 5 to 95 %RH) | 0 to 99.9 %RH (normal working scope 0 to 80 %RH) |
| Humidity accuracy | ±5 %RH | ±2 %RH typical, ±5 %RH max at the extremes |
| Humidity resolution | 1 %RH | 0.1 %RH |
| Sampling period | 1 to 2 s depending on revision; plan on 2 s | 2 s minimum |
| Humidity element | Resistive | Capacitive polymer film |
| Interface | Single-wire, bidirectional (not Dallas 1-Wire) | Same protocol, different data format |
| Supply current | About 0.3 mA measuring (up to 2.5 mA in some revisions), about 60 µA idle | About 1 to 1.5 mA measuring, about 40 to 50 µA idle |
| Body | Blue grille, about 15.5 × 12 × 5.5 mm | White grille, about 25 × 15 × 7.7 mm; the AM2302 is the cased version with three wires |
Swipe sideways to see every column →
Figures from the Aosong (ASAIR) DHT11 datasheet and AM2302 technical manual. Cheap clones can be noticeably less accurate, and current figures vary between datasheet revisions, so budget for the higher number.
What is inside
Both sensors hold the same three parts behind the grille: a humidity element, a thermistor for temperature, and a tiny 8-bit microcontroller. The microcontroller reads both elements, applies calibration coefficients stored in its memory at the factory, and runs the single-wire protocol. Every unit is calibrated before it ships, so your code never sees raw resistance or capacitance; it simply receives a five-byte packet.
The real difference is the humidity element. The DHT11 uses a resistive element: a moisture-absorbing substrate whose resistance falls as humidity rises. It is cheap, but it is only trustworthy between about 20 and 90 %RH. The DHT22 uses a capacitive element: a thin polymer film between two electrodes whose capacitance changes as it absorbs water vapour. That is what gives it the full 0 to 100 %RH range, ±2 %RH accuracy and tenths of a percent, and it is most of the price difference.
Pinout
| Pin | Name | Description |
|---|---|---|
| 1 | VCC | Power, 3.3 to 5.5 V for both sensors. Use the same voltage as your microcontroller's logic (3.3 V for an ESP32). |
| 2 | DATA | Bidirectional data line. Needs a pull-up resistor to VCC (built into most 3-pin modules). |
| 3 | NC | Not connected. Leave it unwired. |
| 4 | GND | Ground, shared with the microcontroller. |
Swipe sideways to see every column →
The DHT11 and DHT22 share this pin order. Pins are numbered left to right with the grille facing you and the legs pointing down. On 3-pin modules the order is printed on the board and varies between sellers.
Bare sensor or module? The bare part has four legs and needs a pull-up resistor (4.7 kΩ to 10 kΩ) between DATA and VCC. The 3-pin breakout modules already include that resistor, and often a power LED and a filter capacitor, so you wire just VCC, DATA and GND. Read the silkscreen on your module: common orders are S / + / − and + / OUT / −, and swapping VCC and GND will kill the sensor in seconds.
How the single-wire protocol works
Neither sensor talks until it is asked. A conversation looks like this:
- Start signal - the microcontroller pulls DATA low, then releases it and lets the pull-up bring the line high. The DHT11 needs at least 18 ms of low; the DHT22 wakes after about 1 ms (its datasheet allows 0.8 to 20 ms). That overlap is how one library can drive either sensor.
- Response - the sensor answers by pulling the line low for about 80 µs, then high for about 80 µs. This is the library's "are you there?" check.
- 40 data bits - each bit starts with a ~50 µs low pulse. The length of the high pulse that follows is the value: about 26 to 28 µs means 0, about 70 µs means 1.
- Back to idle - the sensor releases the line and waits for the next start signal.
Because the bits are decoded by timing microsecond pulses, the library briefly disables interrupts while it reads. That is also why long wires, missing pull-ups and Wi-Fi interrupts on the ESP32 are the usual causes of failed reads. Both sensors send the same 40 bits; they only pack the numbers differently.
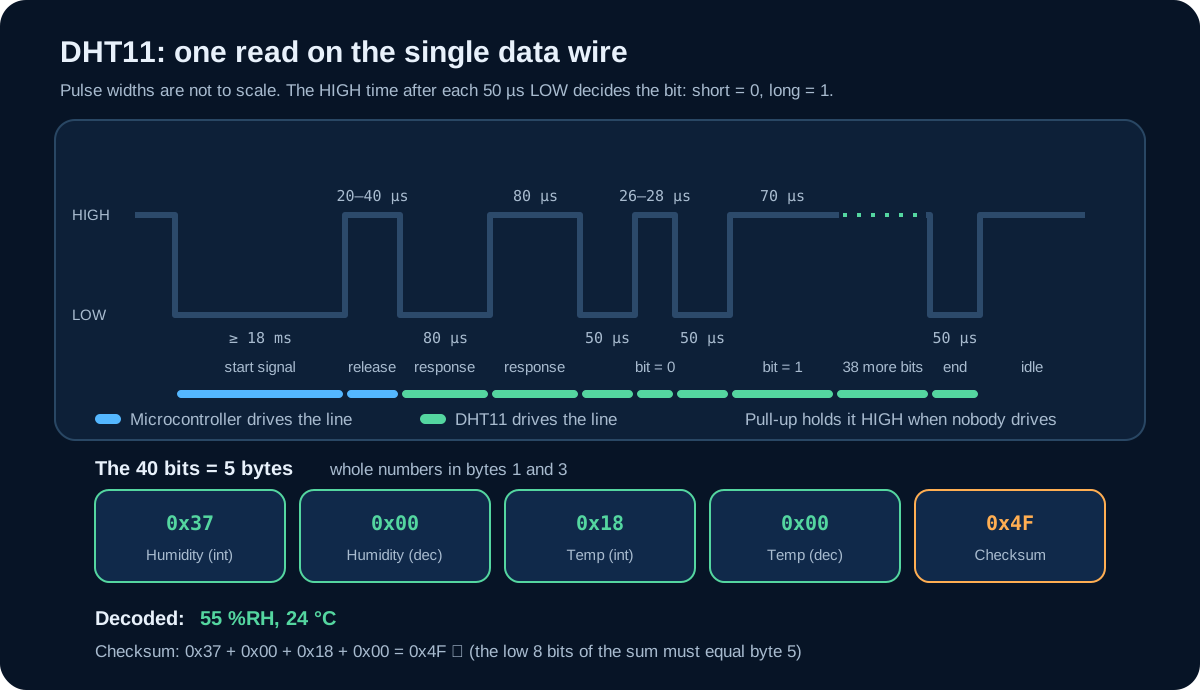
DHT11 frame: whole numbers
| Byte | Contains | Example |
|---|---|---|
| 1 | Humidity, integer part | 0x37 → 55 %RH |
| 2 | Humidity, decimal part | 0x00 |
| 3 | Temperature, integer part | 0x18 → 24 °C |
| 4 | Temperature, decimal part | 0x00 (or tenths on newer parts) |
| 5 | Checksum: low 8 bits of bytes 1 + 2 + 3 + 4 | 0x4F |
Swipe sideways to see every column →
The DHT11 sends whole numbers in the integer bytes. The decimal bytes are 0 on older parts; newer revisions put tenths of a degree in the temperature decimal byte.
Decode a DHT11 frame yourself. Bytes 0x37, 0x00, 0x18, 0x00 arrive with checksum 0x4F. Add the first four: 0x37 + 0x18 = 0x4F, which matches byte 5, so the frame is good. 0x37 is 55 and 0x18 is 24, so the air is at 55 %RH and 24 °C. When the sum does not match, the library throws the frame away and returns NaN; that is what "Failed to read from DHT sensor!" really means.
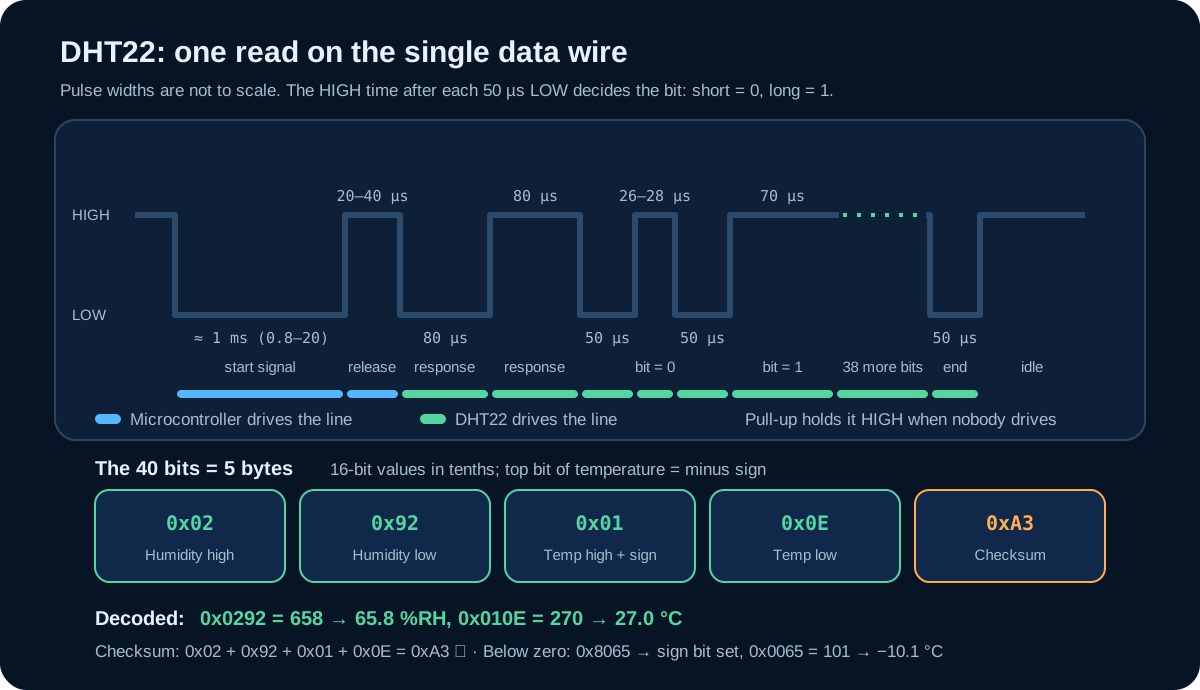
DHT22 frame: tenths and a sign bit
| Byte | Contains | Example |
|---|---|---|
| 1 | Humidity, high byte | 0x02 |
| 2 | Humidity, low byte | 0x92 → 0x0292 = 658 → 65.8 %RH |
| 3 | Temperature, high byte (top bit = sign) | 0x01 |
| 4 | Temperature, low byte | 0x0E → 0x010E = 270 → 27.0 °C |
| 5 | Checksum: low 8 bits of bytes 1 + 2 + 3 + 4 | 0xA3 |
Swipe sideways to see every column →
The DHT22 sends humidity and temperature as 16-bit numbers in tenths: 0x0292 means 65.8 %RH. The top bit of the temperature word is a sign flag, so 0x8065 means −10.1 °C.
Decode a DHT22 frame, including below zero. Humidity arrives as 0x02 0x92, one 16-bit number: 0x0292 = 658, so 65.8 %RH. Temperature 0x01 0x0E = 270, so 27.0 °C. On a frosty night the sensor might send 0x80 0x65 instead. The top bit (0x80) is a sign flag, not part of the value: clear it and 0x0065 = 101, so the reading is −10.1 °C. Libraries handle this for you, but a hand-written decoder that treats 0x8065 as 32,869 tenths reports 3,286.9 °C, a bug you will now recognise.
Tip
The DHT11's bus is not Dallas/Maxim 1-Wire. It uses one wire, but the timing and framing are different, so OneWire and DallasTemperature libraries (made for the DS18B20) will not work. Use a DHT library.
DHT11 vs DHT22: which should you buy?
The two sensors share wiring, libraries and code, so the choice is only about the numbers you need.
- Pick the DHT11 for a first project, a classroom or a rough indoor reading where ±2 °C is fine. Two DHT11s side by side can disagree by 4 °C and 10 %RH and both still be in spec, and it cannot read below 0 °C.
- Pick the DHT22 when the reading drives a decision: a terrarium heater, a dehumidifier, an incubator, a weather station, or anything that can go below freezing.
- Pick neither when you need several sensors on one pin, readings faster than every 2 seconds, or long-term stability in damp air. Long exposure to condensing humidity (above about 95 %RH for days) can shift a DHT22's calibration, and it recovers slowly. I2C sensors such as the SHT31 share one bus and read in milliseconds.
Swapping later costs one line. #define DHTTYPE DHT11 becomes #define DHTTYPE DHT22; the wiring stays the same. Getting that line wrong is a classic bug: a DHT22 decoded as a DHT11 returns small nonsense values, and a DHT11 decoded as a DHT22 usually fails with NaN or reports humidity in the thousands.
DHT11 vs DHT22 vs I2C sensors
| Sensor | Temperature | Humidity | Interface | Pick it when |
|---|---|---|---|---|
| DHT11 | 0 to 50 °C, ±2 °C | 20 to 90 %RH, ±5 % | Single-wire, 1 to 2 s | You want the cheapest working reading for a room, a lesson or a first dashboard |
| DHT22 / AM2302 | −40 to 80 °C, ±0.5 °C | 0 to 100 %RH, ±2 % | Single-wire, 2 s | You need outdoor or sub-zero readings and half-degree accuracy with the same easy wiring |
| AHT20 | −40 to 85 °C, ±0.3 °C | 0 to 100 %RH, ±2 % | I2C | You want better accuracy, faster reads and several sensors on one bus |
| SHT31 | −40 to 125 °C, ±0.3 °C | 0 to 100 %RH, ±2 % | I2C | Precision logging, long-term stability and a built-in heater for condensing air |
| BME280 | −40 to 85 °C, ±1 °C | 0 to 100 %RH, ±3 % | I2C or SPI | You also want barometric pressure and altitude for a weather station |
Swipe sideways to see every column →
Power, pull-up and cable length
- Match the logic voltage. Power the sensor from the same rail as your microcontroller's I/O: 5 V on an Arduino Uno, 3.3 V on an ESP32 or Raspberry Pi Pico. The DATA line is pulled up to VCC, so a 5 V-powered module drives 5 V into the data pin.
- One pull-up, not two. Modules already have one. If you add a second, the combined resistance can get low enough to corrupt bits. On the bare part use 10 kΩ for short wires and drop to 4.7 kΩ for runs of a few metres.
- Short wires first. Under a metre, anything works. For longer runs use twisted pair or a shielded cable, power at 5 V where the board allows it, and keep the cable away from mains and motor wires.
- Let it settle. Wait one to two seconds after power-up before the first read, and request fresh readings no more often than every 2 seconds; the Adafruit library enforces that minimum for both sensors. Reading too often returns the previous value or fails.
- Keep it away from heat. Mounted right next to a voltage regulator, an ESP32 module or a display, the sensor measures the electronics instead of the room. Put a few centimetres of air between them.
Warning
On an ESP32 (or any 3.3 V board) do not power a 3-pin module from 5 V. Its built-in pull-up then pulls the data line to 5 V, which is outside the ESP32's GPIO rating. Power the module from 3V3, or use the bare sensor with a pull-up to 3.3 V.
Ready to build? Both guides work with either sensor and point out where the DHT22's extra precision matters:
- DHT11 and DHT22 with Arduino Uno: Serial readings, humidity alarm, LCD comfort monitor, dew point plotter and a condensation warning
- DHT11 and DHT22 with ESP32: live web page, JSON endpoint, a chart of the last hour and a battery-powered outdoor sensor
Project ideas
- Room comfort monitor (DHT11 is enough) - temperature, humidity and a "too dry / comfortable / too humid" verdict on an LCD1602 or OLED.
- Bathroom fan controller (either) - switch an extractor fan through a relay when humidity climbs past 70 % and back off below 60 %.
- Condensation and mould warning (DHT22) - compute the dew point and warn when a cold wall, window or cellar gets within a couple of degrees of it.
- Outdoor weather station (DHT22) - a battery ESP32 that wakes every 10 minutes, reads and sleeps, with the sensor in a vented, shaded radiation shield.
- Freezer, fridge or garage alarm (DHT22) - the −40 °C floor covers a home freezer at about −18 °C.
- Egg incubator or grow tent (DHT22) - half-degree accuracy holds an incubator near 37.5 °C.
- Clock and weather display - see the Arduino DHT22 weather station clock project.
Common problems
| Symptom | Likely cause | Fix |
|---|---|---|
| NaN, or 'Failed to read from DHT sensor!' every time | No pull-up on a bare sensor, wrong data pin in the sketch, VCC/GND swapped, or the wrong sensor type in the code | Add a 10 kΩ pull-up to VCC, check DHTPIN matches your wire, check the silkscreen order, and set DHTTYPE to your sensor (DHT11 is blue, DHT22 white) |
| NaN only now and then | Reading too often, long or noisy wires, or interrupts (Wi-Fi on the ESP32) disturbing the bit timing | Read no more often than once every 2 seconds, shorten the wires, and simply retry once before reporting an error |
| Temperature reads a few degrees high | Self-heating from nearby electronics or from reading too often | Move the sensor away from regulators and boards; read every few seconds rather than continuously |
| DHT11 humidity sticks at 20 % or 90 % | The air is outside the DHT11's reliable range | Step up to the DHT22 (0 to 99.9 %RH) or an I2C sensor for very dry or very damp air |
| Garbage values on a 3.3 V board | Module powered from 5 V, or a cable so long that 3.3 V is too weak | Power from 3.3 V on the ESP32; keep cables short or use the bare sensor with a 4.7 kΩ pull-up |
| Humidity over 1,000 %, or values far too small | DHTTYPE does not match the sensor: DHT22 data decoded as DHT11 or the other way round | Set DHTTYPE DHT11 for the blue sensor and DHTTYPE DHT22 for the white one (or AM2302) |
| Values freeze at the same number | The sensor stopped answering and the library keeps returning its cached reading | Check power and the pull-up; for field builds, power the sensor from a GPIO so you can power-cycle it |
Swipe sideways to see every column →
Frequently asked questions
How accurate are they? The DHT11 is specified at ±2 °C and ±5 %RH with whole-number resolution: enough to tell a cold room from a warm one, not to control a heater. The DHT22 is specified at ±0.5 °C and ±2 %RH typical with 0.1 resolution. Real units vary and cheap clones vary more, so for anything that matters compare yours with a trusted thermometer and apply an offset in code.
Can they measure below 0 °C? The DHT11 cannot: its range is 0 to 50 °C. The DHT22 reads down to −40 °C, sending temperature as a 16-bit number whose top bit is a sign flag, as in the frame above. For a probe in liquid or soil, use a waterproof DS18B20.
Why do DHT11 readings jump by a whole degree? Because its resolution is 1 °C: a true 24.5 °C can show as 24 and then 25. Averaging the last few readings steadies the number (Sketch 3 in the Uno guide does this on an LCD), but it cannot add accuracy the sensor does not have.
How often can I read them? No more often than once every 2 seconds for a fresh value. The Adafruit library returns its cached result if you ask sooner. If you need faster updates, use an I2C sensor such as the SHT31.
Can I use them with 3.3 V boards? Yes, both run from 3.3 to 5.5 V. On 3.3 V keep the wires under about a metre, and power a 3-pin module from 3.3 V on an ESP32 so its pull-up does not put 5 V on the data pin.
What is the difference between the DHT22 and the AM2302? Same sensor. The AM2302 is the DHT22 in a larger case with three wires, and often has the pull-up resistor inside.
Can I put several sensors on one pin? No. Neither sensor has an address, so each one needs its own GPIO pin. For many sensors on one bus, use I2C sensors such as the SHT31 or AHT20.
Can I use them with MicroPython? Yes. MicroPython has a built-in dht module for the ESP32 and Pico; see DHT11 and DHT22 with MicroPython on the ESP32.
Are they waterproof? No. Both are fine in humid air but must not get wet. Outdoors, put the sensor in a vented, shaded enclosure (a radiation shield) so rain and direct sun cannot reach it.
Datasheets and references
- Aosong (ASAIR) DHT11 datasheet and AM2302 / DHT22 technical manual - the sources for the electrical figures and the timing on this page.
- Adafruit DHT sensor library - the library used in the Uno and ESP32 guides; it handles both sensors.
- DHT11 and DHT22 with MicroPython - the same sensors without the Arduino IDE.
Wiring & code
Board integration
Library
DHT sensor library by Adafruit
Arduino IDE > Sketch > Include Library > Manage Libraries > search "DHT sensor library" > install "DHT sensor library" by Adafruit (accept "Adafruit Unified Sensor" when asked)
This guide wires a DHT11 or DHT22 to an Arduino Uno and builds up from the first reading to five working sketches. Both sensors use the same wiring and the same library; one line, DHTTYPE, tells the code which one you have. The first three sketches suit either sensor. The last two, a live dew-point plot and a condensation warning, are where the DHT22's tenths of a degree pay off.
What you need
| Qty | Part | Notes |
|---|---|---|
| 1 | Arduino Uno R3 (or Nano, or Uno R4) | Any 5 V Arduino uses the same wiring and code |
| 1 | DHT11 or DHT22 (AM2302) | Module or bare sensor; 3-pin modules include the pull-up resistor |
| 1 | 10 kΩ resistor | Only for the bare 4-pin sensor (DATA to 5V) |
| 1 | Breadboard and jumper wires | Male-to-female wires if you use a module |
| 1 each | LED, 220 Ω resistor and active buzzer | For Sketches 2 and 5 |
| 1 | LCD1602 with I2C backpack | Only for Sketch 3 |
Swipe sideways to see every column →
Wiring
| DHT pin | Uno pin | Notes |
|---|---|---|
| VCC (+) | 5V | The Uno's 5 V rail; 3V3 also works but 5 V gives longer reliable cable runs |
| DATA (S / OUT) | D2 | Any digital pin works if you change DHTPIN in the sketch |
| NC | — | Bare sensor only. Leave unconnected |
| GND (−) | GND | Shared ground |
Swipe sideways to see every column →
AM2302 (the cased DHT22 with three wires)? The usual colours are red = VCC, yellow = DATA and black = GND, and many AM2302s have the pull-up built in. If reads fail without an external resistor, add 10 kΩ from DATA to 5V.
Why D2? Nothing special about it: the DHT library bit-bangs the protocol, so any digital pin works, including the analog pins used as digital (A0 to A5). D2 simply keeps D0/D1 (USB serial) and D10 to D13 (SPI) free for later additions such as an SD card or an RFID reader.
Pull-up check. Look at the back of a 3-pin module: you should see a small surface-mount resistor, usually marked 103 (10 kΩ). If it is there, do not add another. A bare 4-pin sensor always needs the external 10 kΩ between DATA and 5V.
Warning
Double-check the module's pin labels before powering up. Different sellers print S/+/− and +/OUT/− in different orders, and reversing VCC and GND makes the sensor hot within seconds and destroys it.
Install the library
- 1In the Arduino IDE open Sketch > Include Library > Manage Libraries (or press Ctrl+Shift+I).
- 2Search for "DHT sensor library" and install the one by Adafruit.
- 3When the IDE asks to install dependencies, choose Install All. This adds "Adafruit Unified Sensor", which the DHT library needs to compile.
- 4Select Tools > Board > Arduino AVR Boards > Arduino Uno and pick the Uno's port under Tools > Port.
Tip
If compiling fails with 'Adafruit_Sensor.h: No such file or directory', the dependency was skipped. Install 'Adafruit Unified Sensor' from the Library Manager and compile again.
Sketch 1 - Read temperature and humidity
This is the sketch to start with, and the one you will copy into most projects. It reads humidity and temperature every two seconds, skips failed reads instead of printing garbage, and adds the heat index (how hot it actually feels).
Open Tools > Serial Monitor and set it to 9600 baud. A new line should appear every two seconds. A DHT22 shows real tenths (for example 23.4 °C); a DHT11 usually shows .0. Breathe gently on the sensor: humidity should jump within a few seconds and temperature should rise by a degree or two, then both drift back.
If every line says Failed to read from DHT sensor!, the sensor is not answering: check the pull-up, the data pin and DHTTYPE (see the troubleshooting table below). An occasional failure is normal; the sketch just tries again on the next loop.
How Sketch 1 works
| Line | What it does |
|---|---|
| #include <DHT.h> | Pulls in the Adafruit library, which bit-bangs the single-wire protocol for you |
| DHT dht(DHTPIN, DHTTYPE); | Creates the sensor object. DHTTYPE decides how the 5 bytes are decoded: whole numbers (DHT11) or 16-bit tenths with a sign bit (DHT22) |
| dht.begin(); | Sets the pin to input with pull-up and starts the 2-second timer the library keeps between reads |
| delay(2000); | Waits out the sampling period. Asking sooner just returns the cached previous result |
| dht.readHumidity() / readTemperature() | The first call does the real transaction; the second reuses the same 40-bit frame, so both values come from one read |
| isnan(...) | A failed read (bad checksum or no answer) returns NaN. Skipping the loop keeps garbage off the screen |
| dht.computeHeatIndex(t, h, false) | The 'feels like' temperature from the NOAA formula; false means the inputs are in °C |
Sketch 2 - Humidity alarm with an LED and a buzzer
A single threshold ("on above 70 %") makes an alarm chatter on and off as the reading wobbles around the line. This sketch uses hysteresis: the alarm switches on above 70 % and only switches off once humidity has dropped below 65 %. The same logic drives a relay for a bathroom fan or a dehumidifier.
Extra parts for Sketch 2
| Part | Uno pin | Notes |
|---|---|---|
| LED anode (+) | D7 | Through a 220 Ω resistor; cathode to GND |
| Active buzzer (+) | D8 | Buzzer − to GND. Swap in a relay module's IN pin to drive a fan |
Swipe sideways to see every column →
Tip
To test without waiting for a humid day, cup your hands around the sensor and breathe on it. Humidity passes 70 % within a few seconds, the LED lights and the buzzer beeps; it clears once the reading falls below 65 %.
Sketch 3 - LCD comfort monitor with smoothing
A DHT11 reports whole degrees, so a raw reading flips between 23 and 24 as the air moves; even a DHT22 wobbles by a tenth or two. This sketch keeps the last five good readings and shows their average, which looks calmer and still follows real changes within about ten seconds. The second line turns humidity into a plain-language verdict, and two offset constants let you calibrate against a thermometer you trust.
It also swaps delay() for a millis() timer, so the Uno stays free to read buttons or drive other outputs between measurements.
Extra wiring for Sketch 3
| LCD1602 I2C pin | Uno pin | Notes |
|---|---|---|
| GND | GND | Shared ground |
| VCC | 5V | The backpack and backlight need 5 V |
| SDA | A4 | Also on the SDA pin next to AREF on R3 boards |
| SCL | A5 | Also on the SCL pin next to SDA |
Swipe sideways to see every column →
Install LiquidCrystal I2C by Frank de Brabander from the Library Manager first. If the backlight comes on but no text appears, turn the blue contrast potentiometer on the backpack slowly until characters show, then try address 0x3F. The LCD1602 I2C guide has an address scanner.
Calibrating in two minutes. Put the sensor next to a thermometer you trust, away from the Uno, and wait ten minutes. If the sensor shows 25.0 °C and the thermometer 24.0 °C, set TEMP_OFFSET to -1.0. Do the same for humidity with a hygrometer. An offset removes the fixed error of your particular unit; it cannot improve a DHT11's 1 °C resolution.
The comfort bands (below 30 %RH dry, above 60 %RH humid) follow common indoor guidance. With the DHT11's ±5 %RH tolerance, treat readings within 5 % of a band edge as borderline, not as a verdict.
Sketch 4 - Watch the air in the Serial Plotter
Numbers scrolling past are hard to read. The Arduino IDE's Serial Plotter (Tools > Serial Plotter) draws any label:value pairs it receives as live lines. This sketch sends temperature, dew point and humidity every two seconds, so you can watch a shower, a kettle or an open window change the room in real time. No extra parts are needed.
The dew point is the temperature at which the air would start to condense. It measures how much water is in the air better than relative humidity does, because it does not swing every time the room warms up or cools down. Either sensor works; a DHT22 gives much smoother lines.
Tip
Try this: breathe on the sensor and both humidity and dew point jump (you added water to the air). Then warm the sensor gently with your hand without breathing on it: temperature rises, relative humidity **falls**, but the dew point stays flat, because the amount of water did not change. That one experiment shows why dew point is the number to watch for damp problems.
Sketch 5 - Condensation warning (best with a DHT22)
Water condenses on any surface colder than the dew point: a single-glazed window, an outside wall, a cold-water pipe, a cellar floor. This sketch warns when the spread (air temperature minus dew point) gets small. Below a 3 °C spread the LED lights; below 1.5 °C the buzzer joins in, with hysteresis so neither chatters at the threshold. It uses the same LED on D7 and buzzer on D8 as Sketch 2.
Use a DHT22 here. With a DHT11's ±2 °C and ±5 %RH, the computed dew point can be several degrees off, which is bigger than the thresholds themselves. The sensor measures the room air, so place it close to the cold surface you care about.
What the spread means
| Air minus dew point | What happens | Typical place |
|---|---|---|
| More than 5 °C | Dry surfaces, no risk | A heated room in winter |
| 3 to 5 °C | Cold spots may get damp | Corners behind furniture, window frames |
| 1.5 to 3 °C | Condensation on cold glass and pipes | Bathroom after a shower, unheated bedroom |
| Below 1.5 °C | Fog, dripping surfaces, mould risk if it lasts | Cellar, garage, greenhouse at dawn |
Swipe sideways to see every column →
Tip
Test it without waiting for winter: run a hot shower, or hold the sensor over a mug of hot water for a few seconds. The spread collapses and the LED lights; it clears once the air settles. A relay module on D8 can start a dehumidifier instead of the buzzer.
Troubleshooting on the Uno
Uno-specific problems
| Symptom | Likely cause | Fix |
|---|---|---|
| Every read fails | Wrong pin, no pull-up on a bare sensor, or DHTTYPE set to the other sensor | Confirm DATA is on D2 and DHTPIN is 2, add 10 kΩ from DATA to 5V on bare sensors, and set DHTTYPE to match your sensor |
| 'Adafruit_Sensor.h: No such file' | The Adafruit Unified Sensor dependency is missing | Install it from the Library Manager |
| Serial Monitor shows random characters | Baud rate mismatch | Set the Serial Monitor to 9600 baud to match Serial.begin(9600) |
| Reads fail once a servo or relay is added | Supply dips when the load switches | Power motors and relays from a separate 5 V supply with a shared ground; add a 100 µF capacitor near the sensor |
| Temperature 2 to 3 °C higher than a thermometer | Self-heating or the Uno's regulator warming the air | Mount the sensor on a short cable away from the board |
| Humidity over 1,000 %, or tiny values | DHTTYPE does not match the sensor | DHT11 is the blue one, DHT22 / AM2302 the white one; set DHTTYPE accordingly |
| LCD backlight on but no text (Sketch 3) | Contrast turned down, or the backpack is at 0x3F | Turn the backpack's contrast potentiometer, then try 0x3F in the sketch |
Swipe sideways to see every column →
Arduino Uno FAQ
Does this work on an Uno R4, Nano or Mega? Yes. The library bit-bangs the protocol on any digital pin, so the wiring and all five sketches work unchanged. The Uno R4 is also 5 V.
Can I use an analog pin? Yes, as a digital pin: set DHTPIN to A0 (or 14 on an Uno) and move the wire.
Can I read a DHT11 and a DHT22 at the same time?
Yes, each on its own pin with its own object, for example DHT inside(2, DHT11); and DHT outside(3, DHT22);. Call begin() on both.
Why do I see 24.0, 24.2, 24.4 on the LCD if the DHT11 only reports whole degrees? Those decimals come from averaging five whole-degree readings in Sketch 3. They show the trend more smoothly; they do not make the sensor more accurate.
Why does my DHT22 show -0.0 °C? A reading just below zero, rounded to one decimal, can print as -0.0. It is a valid reading: the sign bit is set and the value is under 0.05 °C.
Is the dew point formula accurate? The Magnus formula is within about 0.4 °C of the full equations between -45 and 60 °C, smaller than the error the sensor's own humidity tolerance adds.
Why delay(2000) and not millis()? To keep the first sketches simple. Once you add buttons or a display, switch to a millis() timer so the Uno is not blocked for two seconds at a time. Sketch 3 shows the pattern.
Where next? Build the Arduino DHT22 weather station clock, switch the alarm output to a relay for a fan or dehumidifier, or move the project to Wi-Fi with the DHT11 and DHT22 ESP32 guide.